
.png)


Hadoop搭建教程
前置条件:
Linux jdk安装包
hadoop 压缩包
centos7
2核2G
NET网络
拥有远程工具,我这利用的MobaXterm
1.关闭防火墙
systemctl stop firewalld
systemctl disable firewalld
systemctl status firewalld
查看ip
ip a远程连接
#进入/opt 创建一个software文件夹
#进入software文件夹,将hadoop压缩包和jdk压缩包拖入到当前文件夹下
[root@master ~]# cd /opt
[root@master opt]# mkdir software
[root@master opt]# cd software/
[root@master software]#
关闭虚拟机
关闭虚拟机
右键master虚拟机,克隆,创建完整克隆,更改虚拟机名称为s1
右键master虚拟机,克隆,创建完整克隆,更改虚拟机名称为s2
master虚拟机、s1虚拟机、s2虚拟机都开机
注意开机顺序
2.设置主机名
刚刚克隆的两台虚拟机,还是mastar的主机名,需要修改主机名为s1和s2
hostnamectl set-hostname master  #在master节点上
hostnamectl set-hostname s1      #在s1节点上
hostnamectl set-hostname s2		  #在s2节点上
修改完成后重启虚拟机
reboot3.关闭s1、s2防火墙
systemctl stop firewalld
systemctl disable firewalld
systemctl status firewalld4..配置三台Linux克隆机主机名称映射hosts文件,打开/etc/hosts
vi /etc/hosts
#注释这两行后添加 三台虚拟机的ip地址和主机名字
#127.0.0.1   localhost localhost.localdomain localhost4 localhost4.localdomain4
#::1         localhost localhost.localdomain localhost6 localhost6.localdomain6
192.168.200.21 master
192.168.200.22 s1
192.168.200.23 s2
配置完成后esc,:wq保存并退出
5.测试三台主机是否能ping通
#在master、s1、s2上ping
ping s1		#master
ping s2		#s1
ping master#	#s2
6.在三个节点上分别输入ssh-keygen -b 1024 -t rsa
然后4个回车
在master中:
[root@master ~]#  ssh-keygen -b 1024 -t rsa
Generating public/private rsa key pair.
Enter file in which to save the key (/root/.ssh/id_rsa):
Created directory '/root/.ssh'.
Enter passphrase (empty for no passphrase):
Enter same passphrase again:
Your identification has been saved in /root/.ssh/id_rsa.
Your public key has been saved in /root/.ssh/id_rsa.pub.
The key fingerprint is:
SHA256:0V3C3jXRkl4VlJcO/24Y/ViTLuQaBaN+9V9yhwALL9k root@master
The key's randomart image is:
+---[RSA 1024]----+
|           .. o=O|
|         . ..+o+=|
|        o o+.o++o|
|         *.o+ oo |
|        S.E .o .o|
|        ..  ooo++|
|         . oo +B*|
|          . .oo+B|
|           .. ...|
+----[SHA256]-----+
[root@master ~]#
在s1中:
[root@s1 ~]#  ssh-keygen -b 1024 -t rsa
Generating public/private rsa key pair.
Enter file in which to save the key (/root/.ssh/id_rsa):
Created directory '/root/.ssh'.
Enter passphrase (empty for no passphrase):
Enter same passphrase again:
Your identification has been saved in /root/.ssh/id_rsa.
Your public key has been saved in /root/.ssh/id_rsa.pub.
The key fingerprint is:
SHA256:H9PjBPLvkmzrfudg3H7uAsZRNxnOFmFBUdIhdjKbvRc root@s1
The key's randomart image is:
+---[RSA 1024]----+
|             =o%X|
|            . &++|
|        . .  + E.|
|         o o. . o|
|        S +.+. ..|
|         . B+o  .|
|         ..o*..  |
|          =o.oo .|
|         +++.oo=o|
+----[SHA256]-----+
[root@s1 ~]#
在s2中:
[root@s2 ~]#  ssh-keygen -b 1024 -t rsa
Generating public/private rsa key pair.
Enter file in which to save the key (/root/.ssh/id_rsa):
Created directory '/root/.ssh'.
Enter passphrase (empty for no passphrase):
Enter same passphrase again:
Your identification has been saved in /root/.ssh/id_rsa.
Your public key has been saved in /root/.ssh/id_rsa.pub.
The key fingerprint is:
SHA256:hAinMxaWvBYItL3GfiEUF6uVuu10Fi2/MZhPYKy1uPg root@s2
The key's randomart image is:
+---[RSA 1024]----+
|+++o.o.          |
|..*=o.o.         |
| .==.+. .        |
| .=o= ...        |
| . B . BS.       |
|  o + * O        |
|   o * * =       |
|    = + o +      |
|   ..E   o       |
+----[SHA256]-----+
7.在三台机中进入.ssh文件夹
[root@master ~]# cd .ssh
[root@master .ssh]#
#
[root@s1 ~]# cd .ssh
[root@s1 .ssh]#
#
[root@s2 ~]# cd .ssh
[root@s2 .ssh]#
id_rsa:私钥 id_rsa.pub :公钥
如何能在master中对s1和s2进行免密登录?需要把master的公钥放到s1和s2的authorized_keys文件里
#在master的.ssh目录中进行:
[root@master .ssh]# ssh-copy-id s1
/usr/bin/ssh-copy-id: INFO: Source of key(s) to be installed: "/root/.ssh/id_rsa.pub"
The authenticity of host 's1 (192.168.200.22)' can't be established.
ECDSA key fingerprint is SHA256:UwBnWOYDH/7kJQrZJe6rw2Afk+uXvtjvThwGXCe8Mn0.
ECDSA key fingerprint is MD5:5e:84:b7:21:14:b3:1a:5e:5c:3d:e6:e0:18:ff:92:ee.
Are you sure you want to continue connecting (yes/no)? yes	  #这里是yes
/usr/bin/ssh-copy-id: INFO: attempting to log in with the new key(s), to filter out any that are already installed
/usr/bin/ssh-copy-id: INFO: 1 key(s) remain to be installed -- if you are prompted now it is to install the new keys
root@s1's password:      #这里输入s1的密码
Number of key(s) added: 1
Now try logging into the machine, with:   "ssh 's1'"
and check to make sure that only the key(s) you wanted were added.
#配置s2的免密登录
[root@master .ssh]#
[root@master .ssh]# ssh-copy-id s2
/usr/bin/ssh-copy-id: INFO: Source of key(s) to be installed: "/root/.ssh/id_rsa.pub"
The authenticity of host 's2 (192.168.200.23)' can't be established.
ECDSA key fingerprint is SHA256:UwBnWOYDH/7kJQrZJe6rw2Afk+uXvtjvThwGXCe8Mn0.
ECDSA key fingerprint is MD5:5e:84:b7:21:14:b3:1a:5e:5c:3d:e6:e0:18:ff:92:ee.
Are you sure you want to continue connecting (yes/no)? yes      #这里输入yes
/usr/bin/ssh-copy-id: INFO: attempting to log in with the new key(s), to filter out any that are already installed
/usr/bin/ssh-copy-id: INFO: 1 key(s) remain to be installed -- if you are prompted now it is to install the new keys
root@s2's password:     #这里是s2的密码
Number of key(s) added: 1
Now try logging into the machine, with:   "ssh 's2'"
and check to make sure that only the key(s) you wanted were added.
[root@master .ssh]#
#配置master的免密登录
[root@master .ssh]# ssh-copy-id master
/usr/bin/ssh-copy-id: INFO: Source of key(s) to be installed: "/root/.ssh/id_rsa.pub"
The authenticity of host 'master (192.168.200.21)' can't be established.
ECDSA key fingerprint is SHA256:UwBnWOYDH/7kJQrZJe6rw2Afk+uXvtjvThwGXCe8Mn0.
ECDSA key fingerprint is MD5:5e:84:b7:21:14:b3:1a:5e:5c:3d:e6:e0:18:ff:92:ee.
Are you sure you want to continue connecting (yes/no)? yes      #这里输入yes
/usr/bin/ssh-copy-id: INFO: attempting to log in with the new key(s), to filter out any that are already installed
/usr/bin/ssh-copy-id: INFO: 1 key(s) remain to be installed -- if you are prompted now it is to install the new keys
root@master's password:      #这里输入master的密码
Number of key(s) added: 1
Now try logging into the machine, with:   "ssh 'master'"
and check to make sure that only the key(s) you wanted were added.
[root@master .ssh]#
在s1中:
[root@s1 .ssh]# ssh-copy-id s2
/usr/bin/ssh-copy-id: INFO: Source of key(s) to be installed: "/root/.ssh/id_rsa.pub"
The authenticity of host 's2 (192.168.200.23)' can't be established.
ECDSA key fingerprint is SHA256:UwBnWOYDH/7kJQrZJe6rw2Afk+uXvtjvThwGXCe8Mn0.
ECDSA key fingerprint is MD5:5e:84:b7:21:14:b3:1a:5e:5c:3d:e6:e0:18:ff:92:ee.
Are you sure you want to continue connecting (yes/no)? yes      #这里输入yes
/usr/bin/ssh-copy-id: INFO: attempting to log in with the new key(s), to filter out any that are already installed
/usr/bin/ssh-copy-id: INFO: 1 key(s) remain to be installed -- if you are prompted now it is to install the new keys
root@s2's password:      #输入s2的密码
Number of key(s) added: 1
Now try logging into the machine, with:   "ssh 's2'"
and check to make sure that only the key(s) you wanted were added.
[root@s1 .ssh]#
配置s2对s1免密
[root@s2 .ssh]# ssh-copy-id s1
/usr/bin/ssh-copy-id: INFO: Source of key(s) to be installed: "/root/.ssh/id_rsa.pub"
The authenticity of host 's1 (192.168.200.22)' can't be established.
ECDSA key fingerprint is SHA256:UwBnWOYDH/7kJQrZJe6rw2Afk+uXvtjvThwGXCe8Mn0.
ECDSA key fingerprint is MD5:5e:84:b7:21:14:b3:1a:5e:5c:3d:e6:e0:18:ff:92:ee.
Are you sure you want to continue connecting (yes/no)? yes      #这里输入yes
/usr/bin/ssh-copy-id: INFO: attempting to log in with the new key(s), to filter out any that are already installed
/usr/bin/ssh-copy-id: INFO: 1 key(s) remain to be installed -- if you are prompted now it is to install the new keys
root@s1's password:      #这里输入s1的密码
Number of key(s) added: 1
Now try logging into the machine, with:   "ssh 's1'"
and check to make sure that only the key(s) you wanted were added.
[root@s2 .ssh]#
8.在master、s1、s2的.ssh目录下配置权限
[root@s2 .ssh]# chmod 600 authorized_keys
[root@s2 .ssh]#
9.安装jdk
进入到上传压缩包的目录
cd /opt/software
tar -zxvf jdk-8u212-linux-x64.tar.gz
配置环境变量
进入/etv目录编辑profile文件
vi /etc/profile
#在末尾追加环境变量
#如果你自己解压到其他的位置,那么就根据你自己的位置去写参数。
export JAVA_HOME=/opt/software/jdk1.8.0_212
export PATH=$JAVA_HOME/bin:$PATH
配置完成后,让环境变量生效
source /etc/profile使用命令查看是否生效
java -version输出以下结果为生效
[root@master software]# java -version
java version "1.8.0_212"
Java(TM) SE Runtime Environment (build 1.8.0_212-b10)
Java HotSpot(TM) 64-Bit Server VM (build 25.212-b10, mixed mode)
[root@master software]#
10.配置hadoop
在master节点上进行配置,配置完成后使用分发,传给s1和s2
先进入到压缩包目录下,
ls查看当前目录的压缩包,如果没有或者解压失败,删除压缩包,重新进行上传
解压命令 :tar -zxvf [压缩包名]
[root@master software]# cd /opt/software
[root@master software]# ls
hadoop-3.1.4.tar.gz  jdk1.8.0_212  jdk-8u212-linux-x64.tar.gz
[root@master software]#tar -zxvf hadoop-3.1.4.tar.gz
解压完成后使用ls查看当前目录下的文件及文件夹
[root@master software]# ls
hadoop-3.1.4  hadoop-3.1.4.tar.gz  jdk1.8.0_212  jdk-8u212-linux-x64.tar.gz
[root@master software]#
进入到hadoop目录,编辑 core-site.xml 文件
[root@master /]#cd /opt/software/hadoop-3.1.4/etc/hadoop
[root@master hadoop]# vim core-site.xml
#设置为以下内容:
#一般命令模式使用ndd删除行 n 代表数字30dd 删除30行
<configuration>
<!-- 指定NameNode的地址 -->
<property>
<name>fs.defaultFS</name>
<value>hdfs://master:8020</value>
</property>
<!-- 指定hadoop数据的存储目录 -->
<property>
<name>hadoop.tmp.dir</name>
<value>/opt/software/hadoop-3.1.4/data</value>
</property>
<!-- 配置HDFS网页登录使用的静态用户为root -->
<property>
<name>hadoop.http.staticuser.user</name>
<value>root</value>
</property>
</configuration>
配置 hdfs.site.xml 文件
[root@master hadoop]# vi hdfs-site.xml
#替换为以下内容
<configuration>
<!-- nn web端访问地址-->
<property>
<name>dfs.namenode.http-address</name>
<value>master:9870</value>
</property>
<!-- 2nn web端访问地址-->
<property>
<name>dfs.namenode.secondary.http-address</name>
<value>s2:9868</value>
</property>
</configuration>
配置 yarn.site.xml 文件
[root@master hadoop]# vi yarn-site.xml
#替换为以下文件
#
<configuration>
<!-- Site specific YARN configuration properties -->
<!-- 指定MR走shuffle -->
<property>
<name>yarn.nodemanager.aux-services</name>
<value>mapreduce_shuffle</value>
</property>
<!-- 指定ResourceManager的地址-->
<property>
<name>yarn.resourcemanager.hostname</name>
<value>s1</value>
</property>
<!-- 环境变量的继承 -->
<property>
<name>yarn.nodemanager.env-whitelist</name>
<value>JAVA_HOME,HADOOP_COMMON_HOME,HADOOP_HDFS_HOME,HADOOP_CONF_DIR,CLASSPATH_P
REPEND_DISTCACHE,HADOOP_YARN_HOME,HADOOP_MAPRED_HOME</value>
</property>
</configuration>
配置workers
[root@master hadoop]# vi workers
#将原本的localhost更改为以下内容
master
s1
s2
配置 hadoop-env.sh
#找到环境变量继承行,输入环境变量
# Many of the options here are built from the perspective that users
# may want to provide OVERWRITING values on the command line.
# For example:
#
#  JAVA_HOME=/usr/java/testing hdfs dfs -ls
#
# Therefore, the vast majority (BUT NOT ALL!) of these defaults
# are configured for substitution and not append.  If append
# is preferable, modify this file accordingly.
###
# Generic settings for HADOOP
###
# Technically, the only required environment variable is JAVA_HOME.
# All others are optional.  However, the defaults are probably not
# preferred.  Many sites configure these options outside of Hadoop,
# such as in /etc/profile.d
# The java implementation to use. By default, this environment
# variable is REQUIRED on ALL platforms except OS X!
export JAVA_HOME=/opt/software/jdk1.8.0_212       #将环境变量设置为自己的环境变量,注意环境变量位置
# Location of Hadoop.  By default, Hadoop will attempt to determine
# this location based upon its execution path.
# export HADOOP_HOME=
# Location of Hadoop's configuration information.  i.e., where this
# file is living. If this is not defined, Hadoop will attempt to
# locate it based upon its execution path.
#
# NOTE: It is recommend that this variable not be set here but in
# /etc/profile.d or equivalent.  Some options (such as
# --config) may react strangely otherwise.
#
# export HADOOP_CONF_DIR=${HADOOP_HOME}/etc/hadoop
回到hadoop-3.1.4目录
创建data目录
[root@master hadoop]# cd ../..
[root@master hadoop-3.1.4]# mkdir data
进入sbin目录
[root@master hadoop-3.1.4]# cd sbin/
[root@master sbin]#
分别编辑 start-dfs.sh和stop-dfs.sh 文件
vi start-dfs.sh
vi stop-dfs.sh
在其文件顶部添加以下内容
#!/usr/bin/env bash
HDFS_DATANODE_USER=root
HADOOP_SECURE_DN_USER=hdfs
HDFS_NAMENODE_USER=root
HDFS_SECONDARYNAMENODE_USER=root
分别编辑 start-yarn.sh和stop-yarn.sh 文件
vi start-yarn.sh
vi stop-yarn.sh
在其文件顶部添加以下内容
#!/usr/bin/env bash
YARN_RESOURCEMANAGER_USER=root
HADOOP_SECURE_DN_USER=yarn
YARN_NODEMANAGER_USER=root
11.分发
将hadoop分发到s1和s2当中
使用scp命令
[root@master sbin]# cd ../..
[root@master software]# scp -r hadoop-3.1.4 root@s1:/opt/software
[root@master software]# scp -r hadoop-3.1.4 root@s2:/opt/software
12.配置三个节点的环境变量
使用vi /etc/profile,在文件末尾添加
unset i
unset -f pathmunge
#在末尾追加环境变量
#如果你自己解压到其他的位置,那么就根据你自己的位置去写参数。
export JAVA_HOME=/opt/software/jdk1.8.0_212
export PATH=$JAVA_HOME/bin:$PATH
#HADOOP_HOME
export HADOOP_HOME=/opt/software/hadoop-3.1.4
export PATH=$PATH:$HADOOP_HOME/bin
export PATH=$PATH:$HADOOP_HOME/sbin
完成后保存并退出
让环境变量生效
source /etc/profile13.格式化集群
如果集群是第一次启动,需要在master节点格式化NameNode
(注意:格式化NameNode,会产生新的集群id,导致NameNode和DataNode的集群id不一致,集群找不到已往数据。如果集群在运行过程中报错,需要重新格式化NameNode的话,一定要先停止namenode和datanode进程,并且要删除所有机器的data和logs目录,然后再进行格式化。)
[root@master software]# cd hadoop-3.1.4/
[root@master hadoop-3.1.3]#hdfs namenode -format
格式化成功会输出master的ip地址
2024-04-09 13:18:58,438 INFO util.GSet: capacity      = 2^15 = 32768 entries
2024-04-09 13:18:58,467 INFO namenode.FSImage: Allocated new BlockPoolId: BP-1460655760-192.168.200.21-1712639938457
2024-04-09 13:18:58,482 INFO common.Storage: Storage directory /opt/software/hadoop-3.1.4/data/dfs/name has been successfully formatted.
2024-04-09 13:18:58,542 INFO namenode.FSImageFormatProtobuf: Saving image file /opt/software/hadoop-3.1.4/data/dfs/name/current/fsimage.ckpt_0000000000000000000 using no compression
2024-04-09 13:18:58,802 INFO namenode.FSImageFormatProtobuf: Image file /opt/software/hadoop-3.1.4/data/dfs/name/current/fsimage.ckpt_0000000000000000000 of size 391 bytes saved in 0 seconds .
2024-04-09 13:18:58,824 INFO namenode.NNStorageRetentionManager: Going to retain 1 images with txid >= 0
2024-04-09 13:18:58,851 INFO namenode.FSImage: FSImageSaver clean checkpoint: txid = 0 when meet shutdown.
2024-04-09 13:18:58,852 INFO namenode.NameNode: SHUTDOWN_MSG:
/************************************************************
SHUTDOWN_MSG: Shutting down NameNode at master/192.168.200.21
************************************************************/
[root@master hadoop-3.1.4]#
14.集群启动
去到sbin目录下
需要启动两个文件
./start-dfs.sh
./start-yarn.sh
启动如下
[root@master hadoop-3.1.4]# cd /opt/software/hadoop-3.1.4/sbin/
[root@master sbin]# ./start-dfs.sh
WARNING: HADOOP_SECURE_DN_USER has been replaced by HDFS_DATANODE_SECURE_USER. Using value of HADOOP_SECURE_DN_USER.
Starting namenodes on [master]
上一次登录:二 4月  9 09:49:56 CST 2024从 192.168.200.1pts/0 上
Starting datanodes
上一次登录:二 4月  9 13:22:44 CST 2024pts/0 上
s1: WARNING: /opt/software/hadoop-3.1.4/logs does not exist. Creating.
s2: WARNING: /opt/software/hadoop-3.1.4/logs does not exist. Creating.
Starting secondary namenodes [s2]
上一次登录:二 4月  9 13:22:47 CST 2024pts/0 上
[root@master sbin]# ./start-yarn.sh
Starting resourcemanager
上一次登录:二 4月  9 13:22:52 CST 2024pts/0 上
Starting nodemanagers
上一次登录:二 4月  9 13:23:11 CST 2024pts/0 上
[root@master sbin]#
集群启动成功,去浏览器输入master的ip地址加上映射端口地址9870
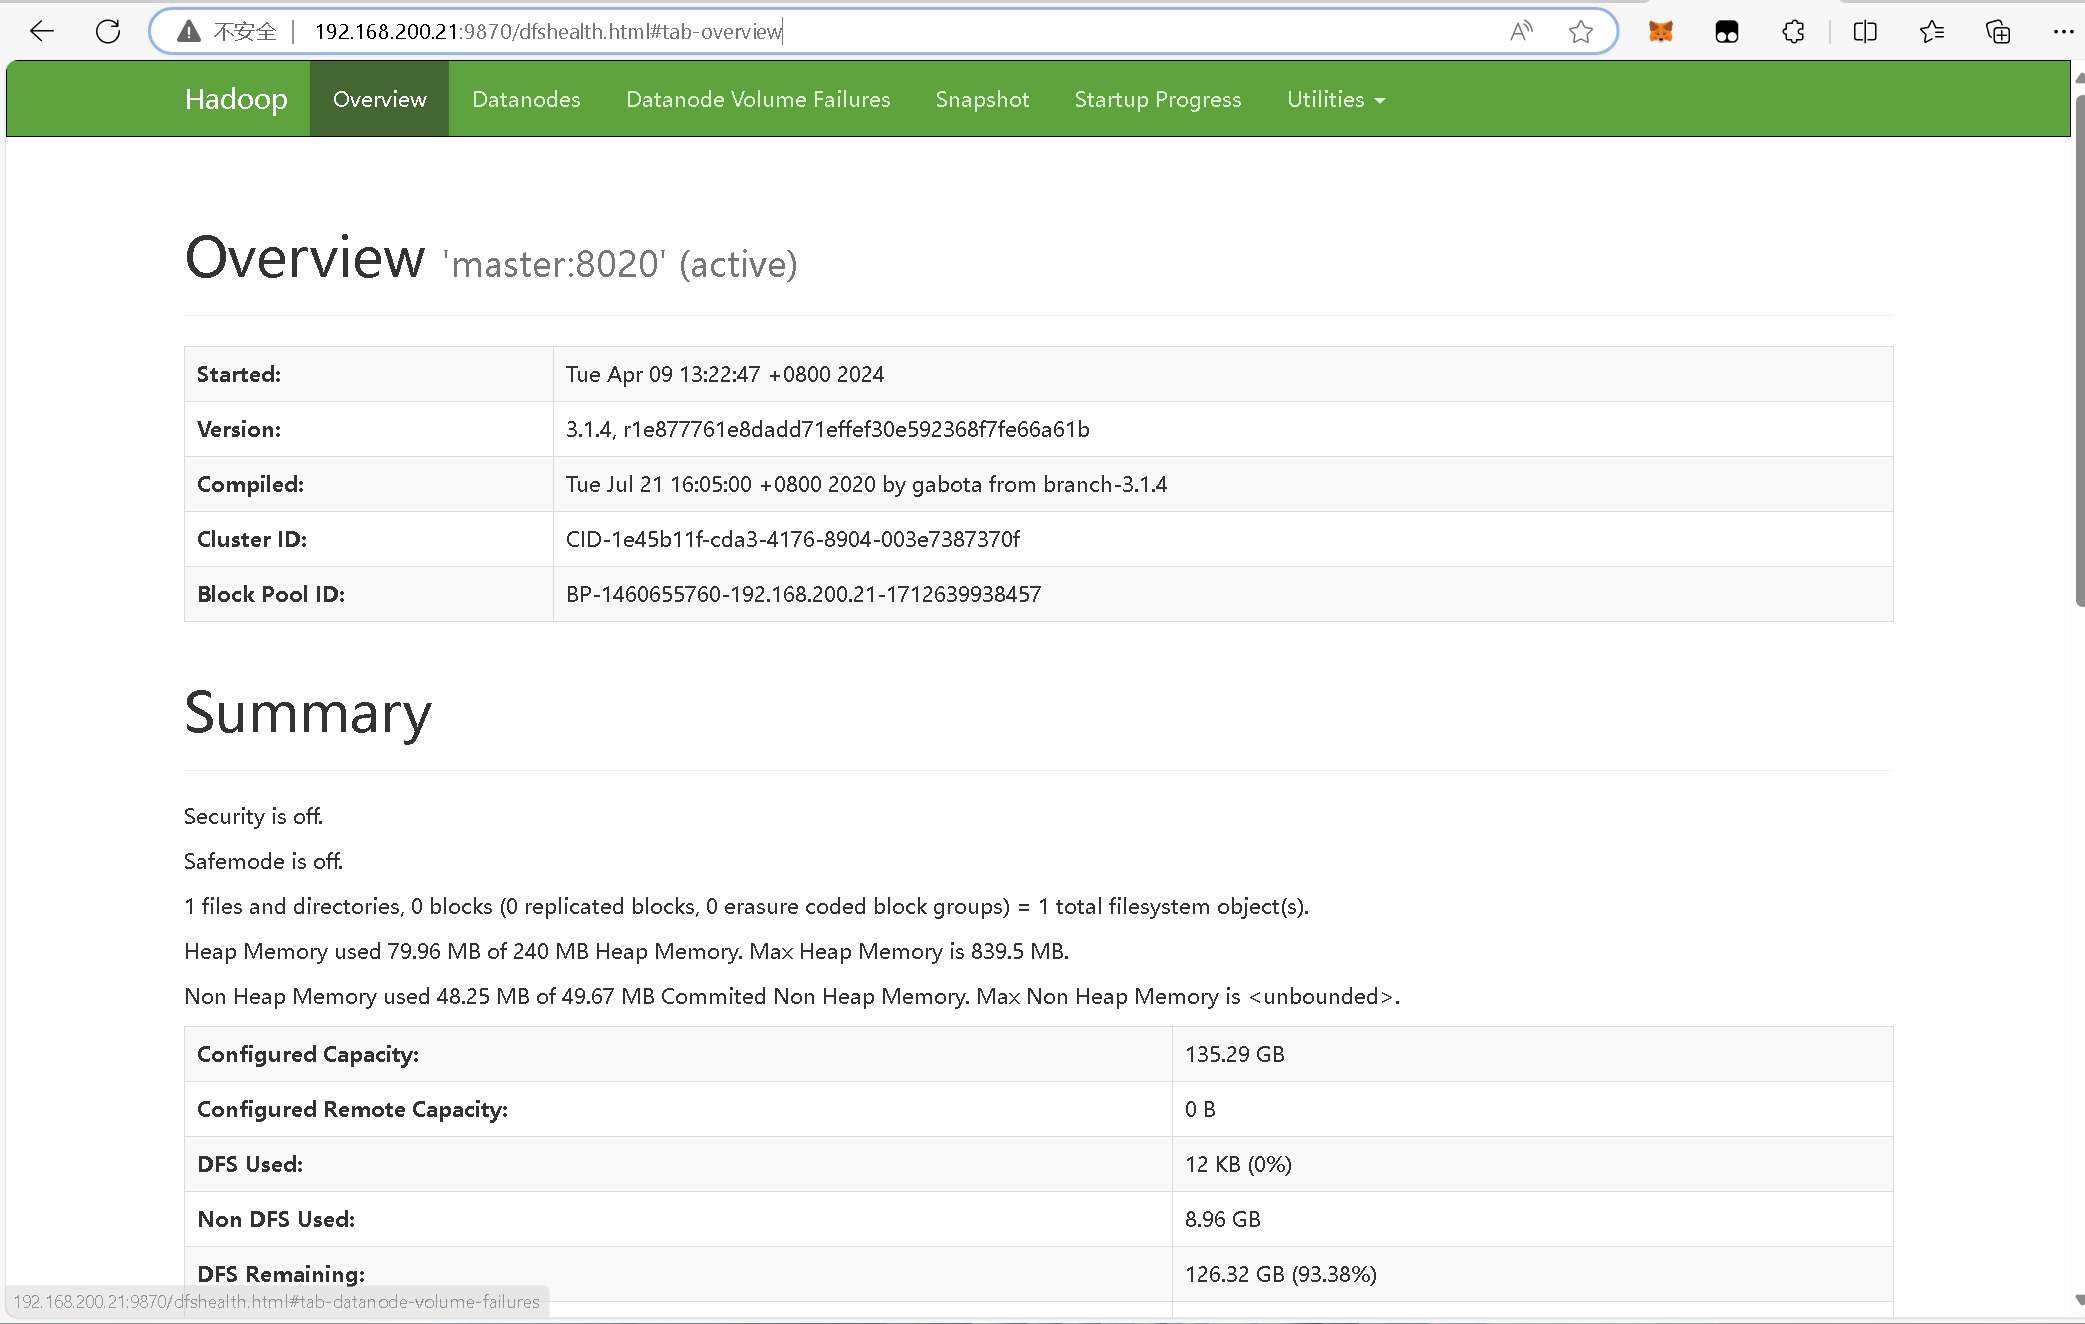
评论区